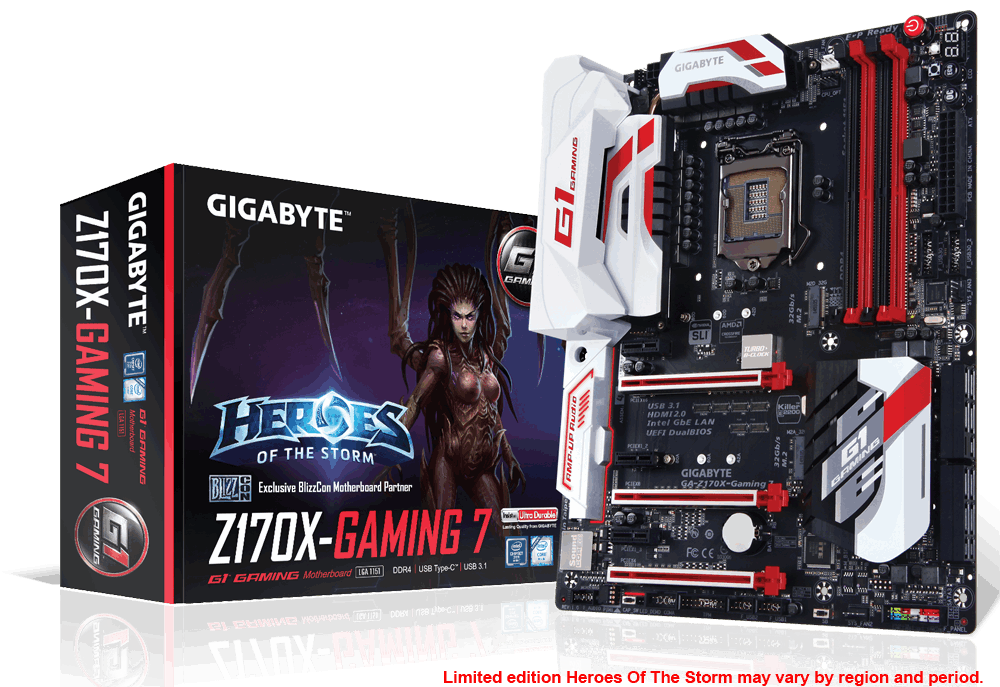
Intel has spilled very few details about its Skylake processors during its initial release, and in my previous review I covered most of what was revealed at launch. But that changed in the Intel Developer’s Forum (IDF). In this year’s edition, Intel removed the lid from a lot of details it earlier held back about the architecture for Skylake. While we will be reserving the detailed look into Skylake’s iGPU architecture in a separate article, for this one I’ll be looking at Intel’s first Skylake i5 part, the Core i5-6600K. The platform for our testing would be on GIGABYTE’s Z170X-Gaming 7, a motherboard at almost the top of their gaming stack, which we should be reviewing as well.

The Core i5 processors have always been the more popular amongst consumers due to their price and performance ratio. When Intel introduced the i5-750 five years back, it opened the gates to something new – overclocking for cheap. With time the i5-2500K emerged as one of Intel’s most venerable members of that prestigious league, where you didn’t need to invest in a top of the line processor to overclock your system. I had personally seen and used many i5-2500Ks that could go beyond 5 GHz on air, and some would even do 5.3-5.4GHz. While going beyond 5GHz would certainly amount to a silicon lottery, most of the chips Intel produced were very good and presented fantastic value for most gamers and users. But the generational bug had bit the i5 as well. With Ivy Bridge, Haswell & Devil’s Canyon, the i5 wouldn’t overclock as much as its predecessor. For the i5-4690K, the last commercially available i5 processor (Broadwell notwithstanding), good processors could only do 4.2-4.4GHz on air, and ones that would go beyond 4.5GHz without significant voltage inputs would be considered really good. So like the i7, Skylake presents a retrieval job for Intel on their i5 range too.

The i5-6600K is in all aspects, an i5 processor. That means the Hyper Threading gets stripped from it, leaving only 4 physical cores to do the heavy lifting. The clock speeds are reduced to 3.5 GHz stock /3.9 GHz Turbo (4.0/4.2GHz turbo in the i7-6700K) and L3 Cache gets reduced to 6MB (compared to 8MB in the i7-6700K). The iGPU stays the same, but with previous experience it is safe to say that for the i5, the HD 530 operates at a lower frequency band. The configuration stays the same with three slices of 8 EUs each, making a total of 24 EUs. The TDP at 91W is also unchanged from the i7 part, which in turn is a slight increase from Devil’s Canyon and Haswell (88/84W respectively). With the rest of the specifications staying the same, the i5 in theory looks like a good contender in the mid-range space. Whether the performance is also mid-range is the subject of this review.

GIGABYTE’s Z170 motherboard range, like their Z97 and X99 ones, is huge and probably the biggest of any of their competition. Their entire segment is split into mainstream Ultra Durable boards (UD* after the Z170X moniker), the Gaming G1 series (Gaming 3/5/7/G1/GT), and the Super Overclock series (SOC, SOC Force and SOC Champion). Adding into the mix are certain ‘Black Edition’ motherboards with enhanced components that fall somewhere in between, further muddling the roster for the average customer. But if nothing, this represents the manufacturer’s willingness to provide as many options as possible to the potential buyer: if you are happy with the minimum number of features and want to stick to only what the platform offers, choose the normal line of boards. If you are a gamer, go for the Gaming series. Overclockers should look for the SOC series, and so on.

Z170X-Gaming 7 Normal Packaging

Z170X-Gaming 7 Heroes of the Storm Packaging
For Z170, GIGABYTE has introduced two new features which pop out immediately. First one is metal shielding around the PCIe slots. This is done to add extra rigidity to the plastic construction of the PCIe slots. I feel this is a nice step since most of the GPUs today are heavy and exert a huge pressure on the connectors and even with the card(s) being screwed to the cabinet, in most cases they have a noticeable sag. This is a nice measure to counter that, and GIGABYTE says the shielding will also negate any electromagnetic interference that may arise near the connector.
The second is the inclusion of a dedicated IC for BCLK based overclocking. We have seen a similar implementation amongst other manufacturers but GIGABYTE’s implementation is more prominent, with the chip residing under a metallic shield of its own, akin to the audio chips. The BCLK chip is placed near the first PCIe slot, immediately below the CPU socket.
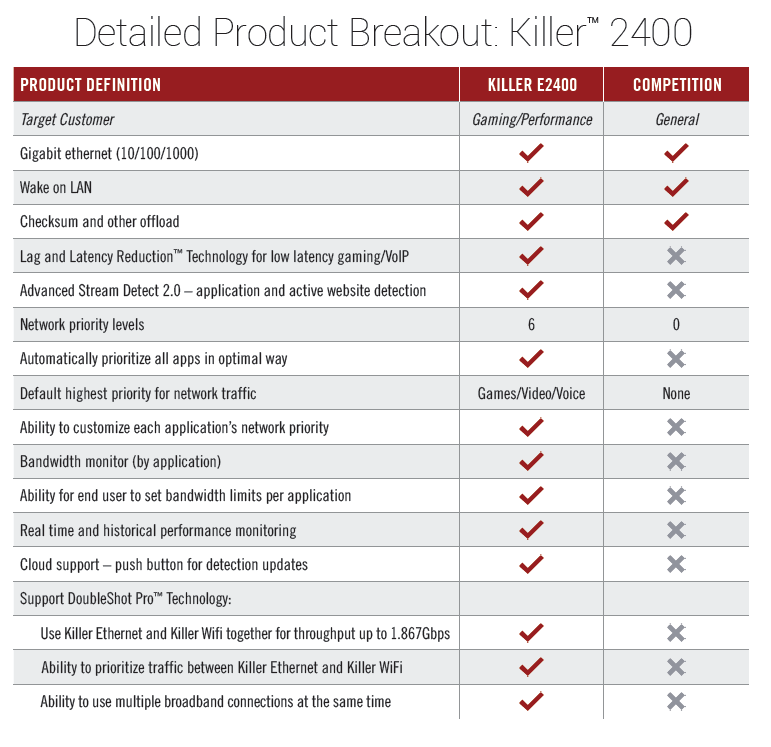
There’s another new thing that deservers mention here – the Killer E2400 network controller. This comes with Rivet’s Advanced Stream Detect 2.0 technology, which is geared for better data network detection and optimization. This controller will be available in a selected group of motherboards, and the Z170X-Gaming7 falls in them (GIGABYTE’s Z170X-Gaming GT also has the same controller, while the Z170X-Gaming G1 has the top of the line DoubleShot-X3, which combines dual E2400 controllers with a Wireless AC 1535 module).
Z170X-Gaming 7 Visual analysis:
The trend of covering the top of the I/O ports seems to catch on, as most motherboard manufacturers have adopted this formula for their line-up. GIGABYTE is a new entrant to this foray, and the style deviates from its earlier black and red colour precedence to white and red. While I like the colour choice, the glossy plastic implementation means that the cover looks more pedestrian than utilitarian. I would have loved to see a metal, matte cover that would have added some weight to the board, but introducing metal comes with its own set of problems. The cover extends to the audio section as well, covering most of the components. The red and white predominance gives rise to many build log ideas, and since we have many similar coloured RAM kits and even GPUs with white shrouds/PCBs, pairing them with this board should result in a rather nice looking computer build.
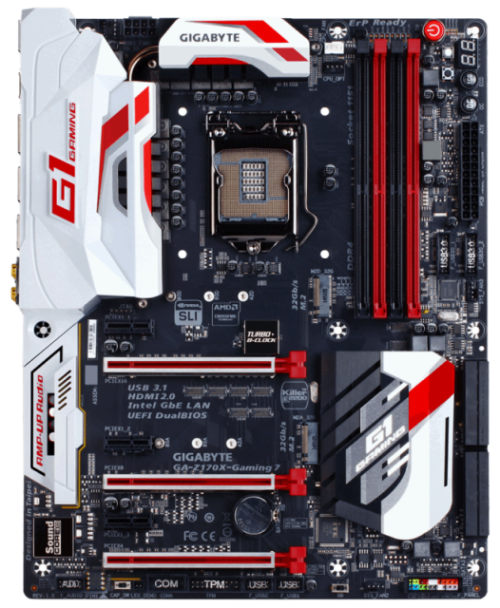
With X99 boards, GIGABYTE introduced lighting in the I/O shield. The I/O shield was made a touch thicker to route the wiring for the sole LED and there was a special connector in the motherboard, generally near the first PCIe slot, to feed power to it. For the first generation of supported boards, the LED was an UV one and the I/O shield was coated with UV reactive paint. The connector in turn was two-pin; only providing power to run the LED. With the Z170 boards, that changes. The I/O shield LED has now same colour spectrum as the audio path LEDs and are controlled by the same options either in the UEFI or in the application. The motherboard connector to the LED is now upgraded to a full 4-pin affair and is positioned in the narrow space between the I/O covers and the top VRM heatsink.
For the VRM GIGABYTE is using a 12phase all digital solution for power delivery. It is strange that that there no International Rectifier driver or controller ICs are on-board for the Gaming 7, something that we are accustomed to see in GIGABYTE’s boards.
The eight pin CPU power connector is at the top right hand corner, flanked by the top VRM heatsink. On the other side of the heatsink are two four pin fan connectors, CPU_FAN and CPU_OPT, with the CPU_FAN marked white, possibly indicating it can be used to drive pumps for the water cooling setup. Next to it are colour-matched DRAM slots. The Gaming 7 supports up to 64GB of DDR4/DDR3L memory of speeds 3866MHz in dual channel configuration. Interestingly, GIGABYTE also lists support for UDIMMs in both non-ECC and ECC mode (running in non-ECC mode). Above the memory slots are the voltage checkpoints and the usual trio of buttons (Power, Reset and Clear CMOS). Next to it is the LED debug display. Two new buttons are introduced here – OC and ECO, for automatic overclocking and activating the ECO power profile (power saving). Coming down, the 24pin motherboard connector is in its usual location, followed by two USB3.0 internal headers.
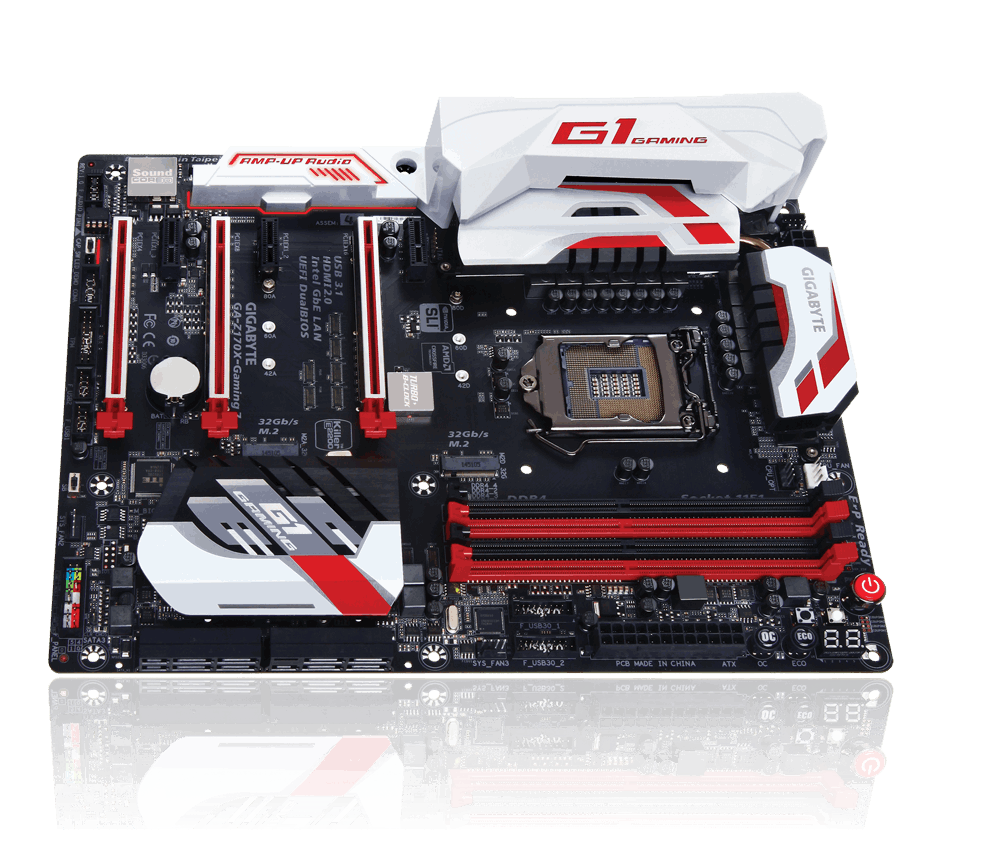
For storage we have six SATA3 6Gbps connectors from the PCH, and two SATA3 6Gbps ports from the ASMedia ASM1061 chip. The PCH SATA ports are also part of three SATA express slots. The ASMedia controller converts a PCIe x1 bandwidth to two SATA 6Gbps ports and support only AHCI mode.
There are two M.2 Socket 3 32Gbps slots on board, one right below the CPU socket, and the other between the first two PCIe x16 slots. The second M.2 slot shares bandwidth with the third PCIe x16 slot, so users need to make a choice between using any one between the two.
The bottom of the motherboard is filled with headers. From right to left, we have front panel headers, a four pin fan header (SYS_FAN2), SB Switch, two USB2.0 internal header, Trusted Platform Module header, COM port header, LED_DEMO connector, the audio gain switch (CAP_SW), the removable OP-AMP for the audio, and the front panel audio header.
Let’s talk about PCIe expansion now. The Z170X-Gaming 7 supports up to 3-way multi-GPU setup, and three PCIe x16 slots are provided for that purpose. But there’s a catch since it doesn’t come with any PLX chips onboard – the third PCIe slot is only wired x4 electrically, rendering tri-SLI useless. You can still do a 3 card CrossFireX, but the third card will be severely bandwidth-starved. Slot spacing wise as well, a two card setup makes more sense in this motherboard. For Z170X, that means the cards will be running at x8/x8. There are three PCIe x1 slots as well. All the PCIe x16 slots are covered by a metallic shield for added rigidity.

For audio, GIGABYTE has chosen to include a Creative Sound Core 3D chip instead of more traditional Realtek based options. Paired with the chip is a TI Burr Brown OPA2134 Operational Amplifier, providing enough amplification for even 600-ohm headphones. This OP-AMP is removable, as GIGABYTE advertises under their AMP-UP Audio feature, to be replaced with another from a set of available alternatives (not part of the package). The gold Nichicon MUSE MW audio capacitors complete the package as well as a gain boost switch to adjust the amplification between 2.5x and 6x modes.

Lastly, for I/O, the Z170X-Gaming 7 has a PS/2 keyboard/mouse combo port, a DisplayPort, a HDMI 2.0 Port, Five USB 3.0 ports (two marked golden yellow for USB DAC-UP power), two USB3.1 Gen2 ports (one Type-A, one Type-C), two GbE ports (One from Intel Jacksonville I219-V controller, another from Killer E2400 chip), and the audio out ports. The Audio out ports and the video out ports are gold plated for better conductivity and performance. The HDMI2.0 port comes courtesy of a MegaChips MCDP2800 chip and provides 4k@60Hz display output.
In the box:
- Multilingual Installation Guide
- Driver DVD
- Two sets of SATA cables, 6Gbps
- Flexible SLI Cable x1
- I/O Shield
- A Heroes of the Storm themed Door hanger
- The Heroes of the Storm motherboards will carry Blizzard promotional material
UEFI walkthrough:
I have been critical of GIGABYTE in the past for their implementation of UEFI. In Z97 and earlier iterations, the GIGABYTE UEFI has been a mixture of three different modes containing more or less the same options. You had an easy mode, an advanced mode and an OC mode – which was really confusing. The UEFI performance was also a matter of scrutiny, since many users felt there was a significant mouse lag in UEFI. GIGABYTE resolved many of those issues in X99, and now in Z170, I can say that the UEFI looks the best that they had ever produced. The OC mode is gone, and the black/white design of the X99 UEFI has been ported here, making the entire UEFI easy to understand and navigate for the most part. The mouse acceleration and performance has been tweaked as well and now works as it should.
![M.I.T._[20-56-53]](http://techarx.com/wp-content/uploads/2015/08/M.I.T._20-56-53.jpg)
Most of GIGABYTE’s CPU and DRAM related options are inside the M.I.T menu (Motherboard Intelligent Tweaker). The first page shows basic information like BIOS Version, BCLK, CPU and DRAM Frequency, CPU Temperature and VCore. Detailed information about the CPU & memory is listed in the Current Status, while PC Health Status lists details about system voltages. Again, I think these two should be merged into one, since having three or four different statuses showing similar information is not required. We also have a dedicated System Information tab which shows BIOS version, BIOS release date etc., further hampering the ease of usage.
![M.I.T. Current Status_[20-57-00]](http://techarx.com/wp-content/uploads/2015/08/M.I.T.-Current-Status_20-57-00.jpg)
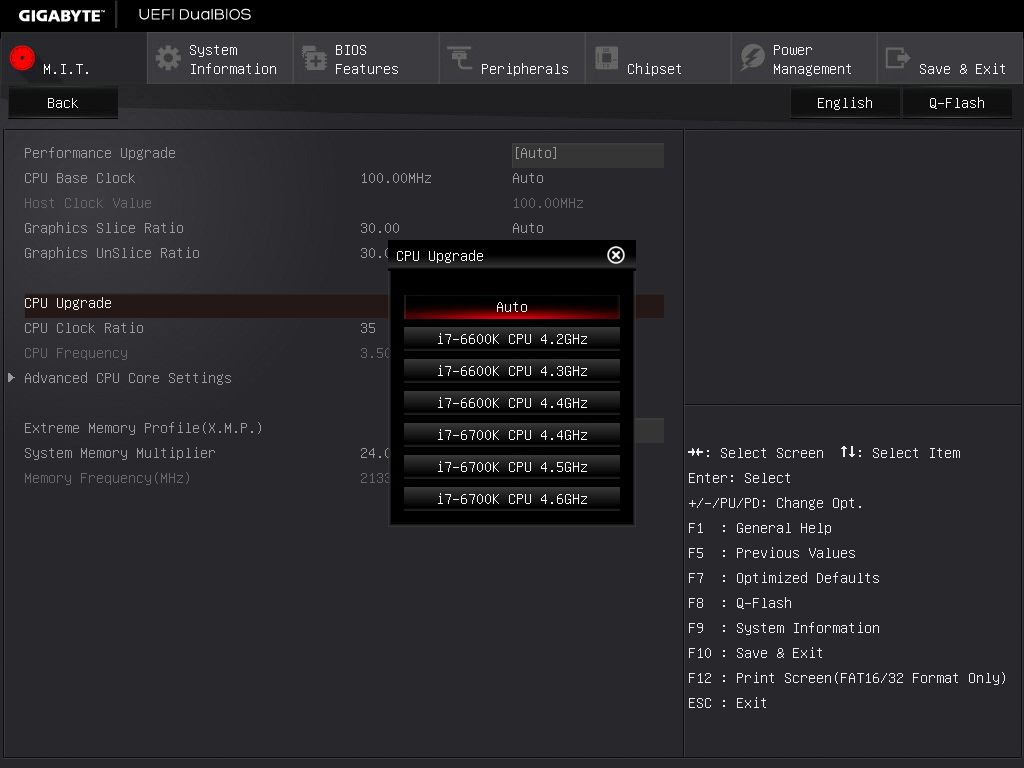
Under M.I.T, the Advanced Frequency Settings has most of the ‘overclocking’ features built in. GIGABYTE details the options that can be used from automatic to manual. Performance Upgrade can automatically enhance the performance of the system by theoretically measuring the overclock required to achieve so and then applying it to the CPU and DRAM, while CPU Upgrade has a few custom profiles made for Core i5-6600K and Core i7-6700K that can be used to bump the CPU frequency to that very speed. I am happy to see GIGABYTE introduce the option to tinker the Graphics Slice/Unslice Ratios here – something that can be used to overclock or underclock the GT530 iGPU of Skylake. In the Frequency menu the ability to switch XMP profiles on and off are also provided.![Advanced CPU Core Settings_[20-57-13]](http://techarx.com/wp-content/uploads/2015/08/Advanced-CPU-Core-Settings_20-57-13.jpg)
In Advanced CPU Core Settings the options for Uncore is detailed, as well as CPU/DRAM power limits and CPU C states.
![Advanced Memory Settings_[20-57-34]](http://techarx.com/wp-content/uploads/2015/08/Advanced-Memory-Settings_20-57-34.jpg)
![Channel A Memory Sub Timings_[20-57-48]](http://techarx.com/wp-content/uploads/2015/08/Channel-A-Memory-Sub-Timings_20-57-48.jpg)
![IMC Timing Settings_[20-57-44]](http://techarx.com/wp-content/uploads/2015/08/IMC-Timing-Settings_20-57-44.jpg)
Advanced Memory Settings menu has the usual options for DRAM, including individual channel Sub timing changes, XMP, and IMC Timing changes.
![Advanced Voltage Settings_[20-57-54]](http://techarx.com/wp-content/uploads/2015/08/Advanced-Voltage-Settings_20-57-54.jpg)
Advanced Voltage Settings, as the name suggests, has options for CPU/DRAM/PCH voltage and power.
![BIOS Features_[20-58-29]](http://techarx.com/wp-content/uploads/2015/08/BIOS-Features_20-58-29.jpg)
BIOS Features lists boot options – BBS priorities, fast boot amongst many.![Peripherals_[20-58-58]](http://techarx.com/wp-content/uploads/2015/08/Peripherals_20-58-58.jpg)

The Peripherals tab is extensive and has controls for the on-board devices. The option for motherboard LEDs can be accessed from here. Audio LED and Rear Panel LEDs can be set to be Still, Beat or Pulse modes and can glow in seven colours (Blue, Green, Light Green, Red, Pink, Yellow & White).
![Intel(R) Thunderbolt_[20-59-59]](http://techarx.com/wp-content/uploads/2015/08/IntelR-Thunderbolt_20-59-59.jpg)
![Intel(R) Ethernet Connection (H) I219-V - 40-8D-5C-1D-E1-1B_[21-00-10]](http://techarx.com/wp-content/uploads/2015/08/IntelR-Ethernet-Connection-H-I219-V-40-8D-5C-1D-E1-1B_21-00-10.jpg)
This section also has a dedicated submenu for Intel Thunderbolt and Intel’s Jacksonville Controller, the I219-V.
![Chipset_[21-00-16]](http://techarx.com/wp-content/uploads/2015/08/Chipset_21-00-16.jpg)
Chipset section is pretty Spartan with options and contains VT-d, Audio Controller and iGPU settings.
![Power Management_[21-00-33]](http://techarx.com/wp-content/uploads/2015/08/Power-Management_21-00-33.jpg)
Power Management controls the options of AC Back, Power on and off by keyboard/mouse, and USB DAC Power.
![Save & Exit_[21-00-50]](http://techarx.com/wp-content/uploads/2015/08/Save-Exit_21-00-50.jpg)
Overall, GIGABYTE seems to have taken most of its criticisms seriously and worked on them. While some remain – like confusing arrangement of options and similar sections scattered across the UEFI, for the most part it remains fluid, easy to use and fast to operate.
Bundled Software:
I have discussed GIGABYTE’s App Centre before. Unlike other manufacturers, GIGABYTE approaches the bundled software package in a mobile-esque manner, calling the software modules Apps and the host platform App Centre. For Z170, the App Centre has been given a fresh coat of paint. It is now transparent and sports a cool white theme (colour can be changed). Individual applications are themed white and orange.

Apart from the paintjob, most apps retain their previous functionality here – let’s look at them one by one.

AtBIOS, or @BIOS is the BIOS information and update utility. It also allows to save the current BIOS and has the option to update the BIOS from either local file or from the server.

Ambient LED has the options to change the Audio or I/O LED and has the same options as in the UEFI.

AutoGreen works in tandem with a Bluetooth device to automatically put the system in standby/suspend/hibernate state when the device is out of range.
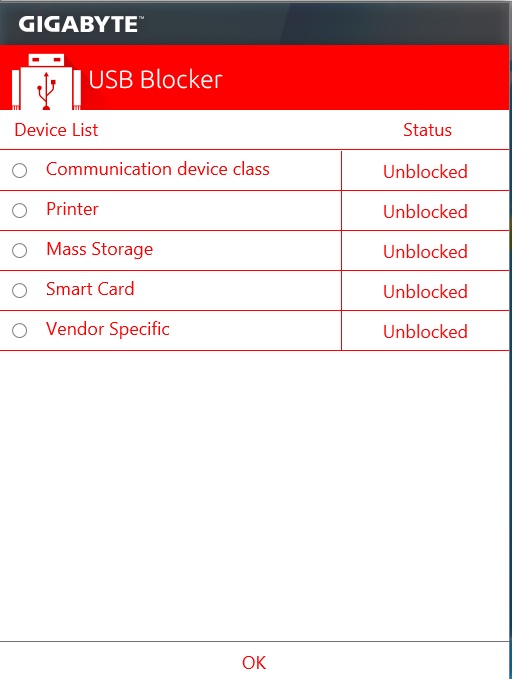
USB Blocker can block certain or all USB devices plugged in the system depending upon Device Class, Mass Storage or even Vendor Specific.

Cloud Station/Cloud Station Server is GIGABYTE’s take on online storage. This allows the centralization of your data from where any portable device (Phone/Tablet) can access it.
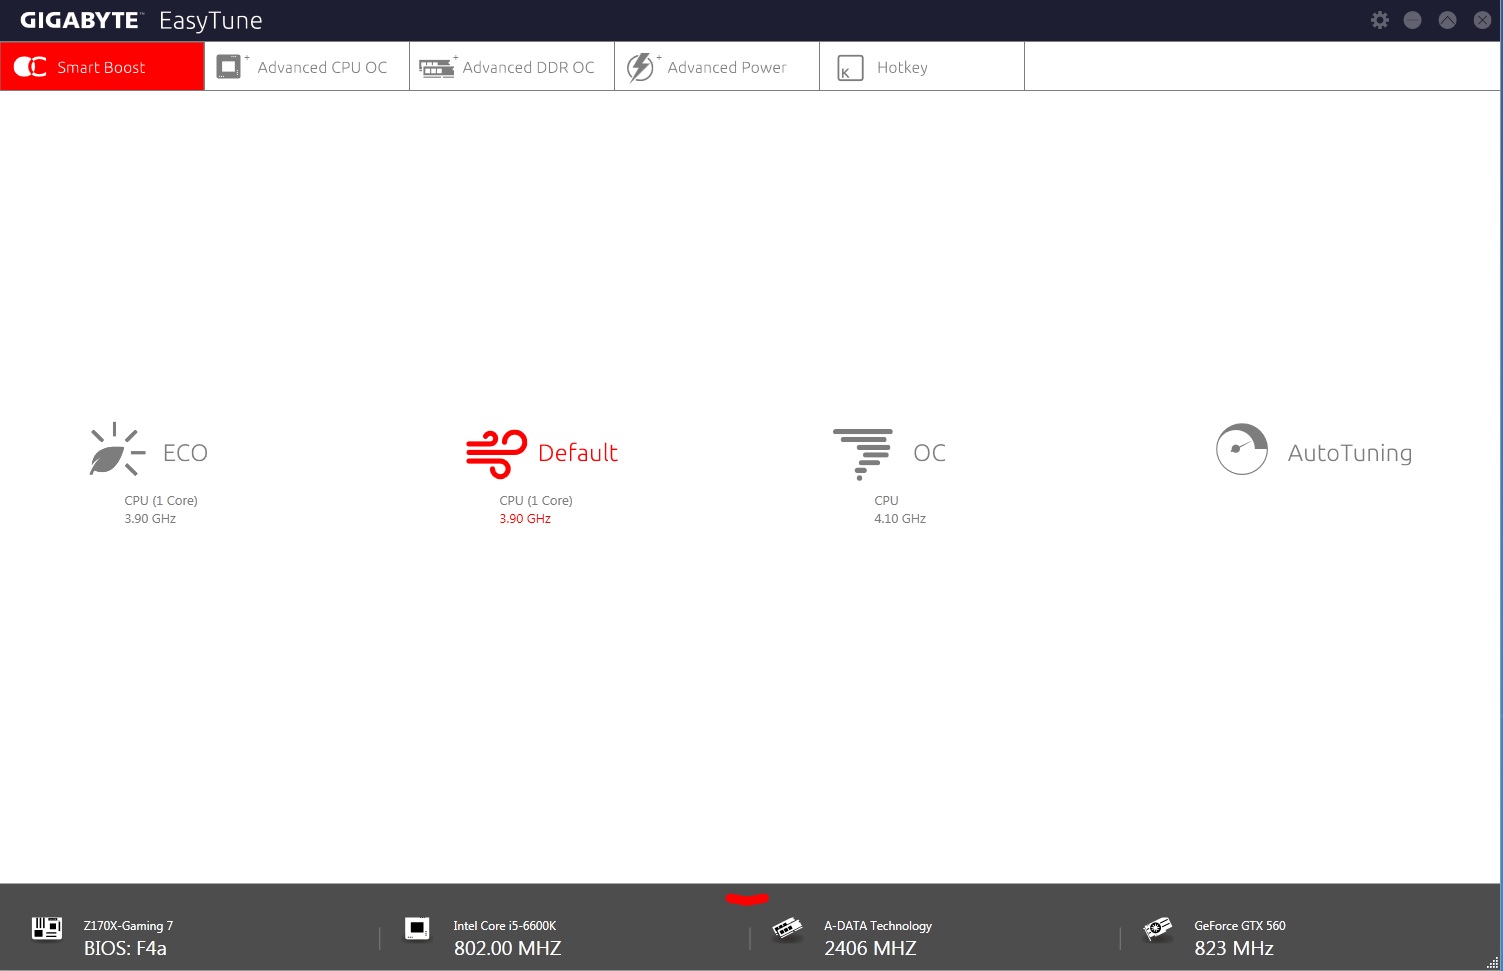
EasyTune is the most important app in the App Centre. It is the core system tweaking utility and comes with submenus for CPU, DRAM and Power tuning.
The Smart Boost menu has brief system information as well as the option to set ECO mode (Power Saving), Default CPU Clock, Overclocked CPU clock as well as AutoTuning, which tunes the system to select the best settings.
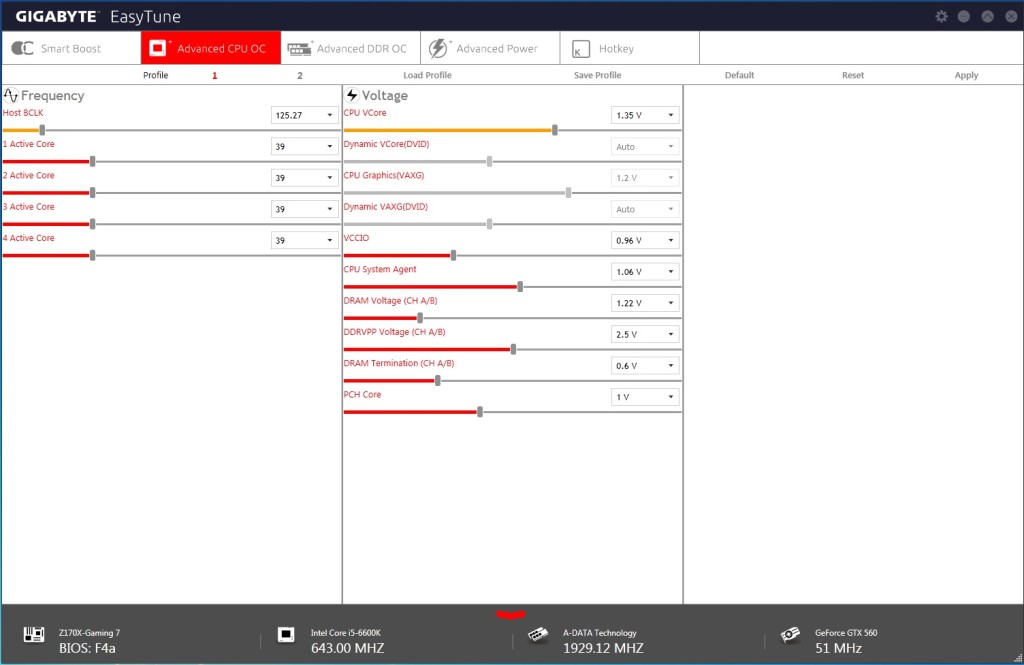
Advanced CPU OC Settings have voltage and frequency settings, along with the newly introduced BCLK settings for Z170.

Advanced DDR OC Settings have XMP profile switching and options to set individual memory channel subtimings.

Advanced Power Settings in the Gaming7 is threadbare with options for only CPU VCore and VAXG LLC.
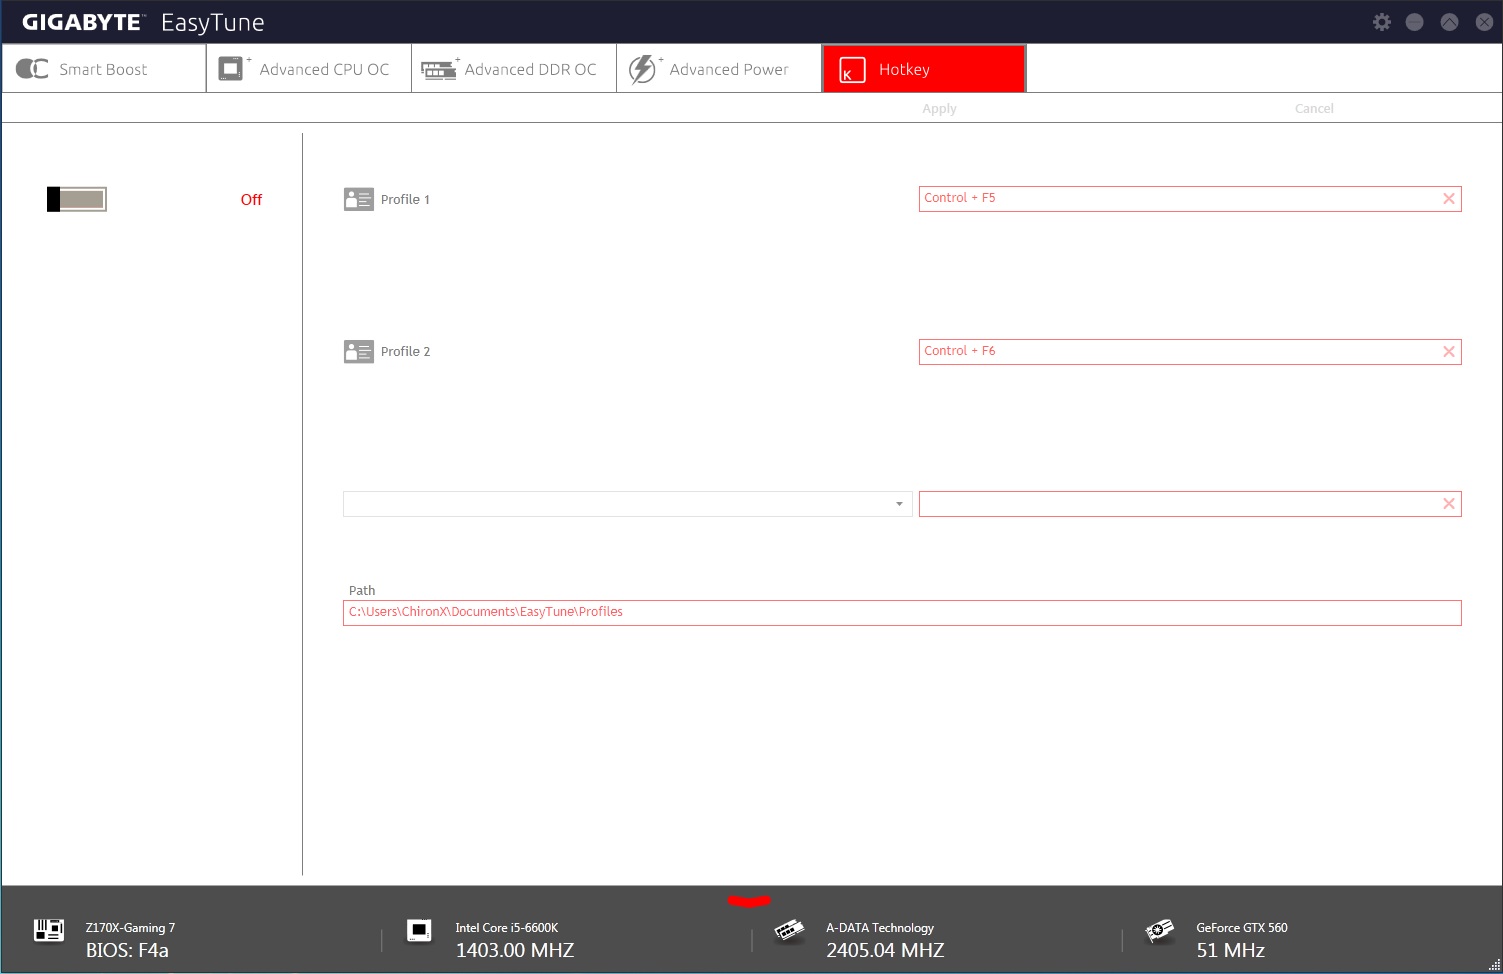
Hotkey menu is self-explanatory.
EZRAID is a software RAID Utility. Unfortunately, I couldn’t get it to run in our test system.
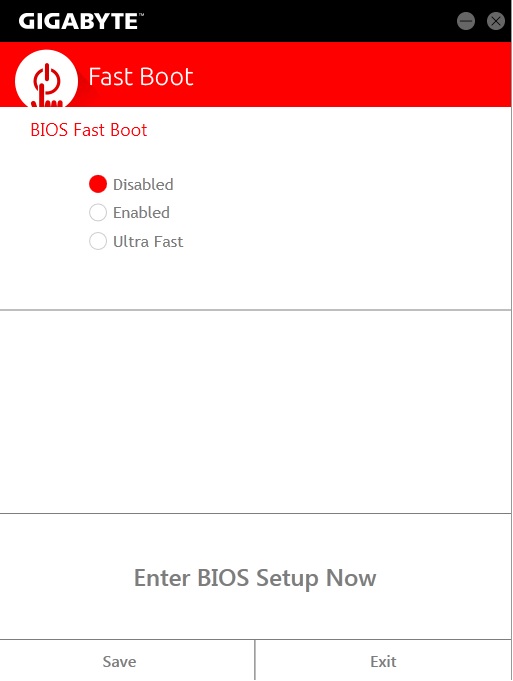
Fast Boot has the option to enable or disable BIOS Fast Boot, and also a direct to BIOS button.
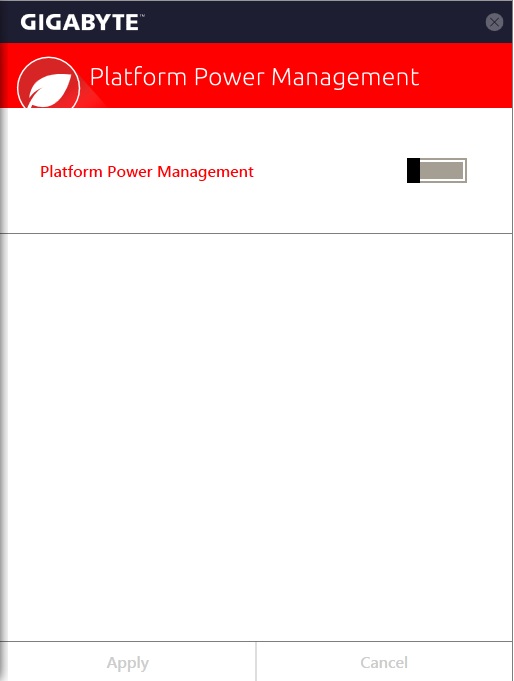
Platform Power Management enables or disables Z170’s built in PPM.


SIV or System Information Viewer lists the details about the system (CPU/DRAM frequencies, motherboard model, BIOS version etc.). It also has the option to calibrate and set fan speeds from either a few preset profiles or manually. Lastly a recording option is there to log the different aspects of the system.

Smart Backup allows taking scheduled backups as well as recovering the system from a previously taken backup.

Smart TimeLock is a system locker utility that enables scheduling when the system would be accessible. This comes especially handy in parental controlling.

Smart Keyboard can be used to use existing keyboard buttons for saved macros. GIGABYTE includes Sniper Key and Smart Login features which can be useful during gaming and system login, respectively.
Other Bundled Software:

Killer Management Suite comes bundled with the GIGABYTE Z170X-Gaming7. Akin cFOS Suite, this is a software solution for network packet prioritization and monitoring. Killer has kept the interface unchanged, which means that it looks like Windows 8’s Metro UI. In my opinion that needs a revision, but as long as the suite works as it is supposed to, I am happy to ignore the dated aesthetics.
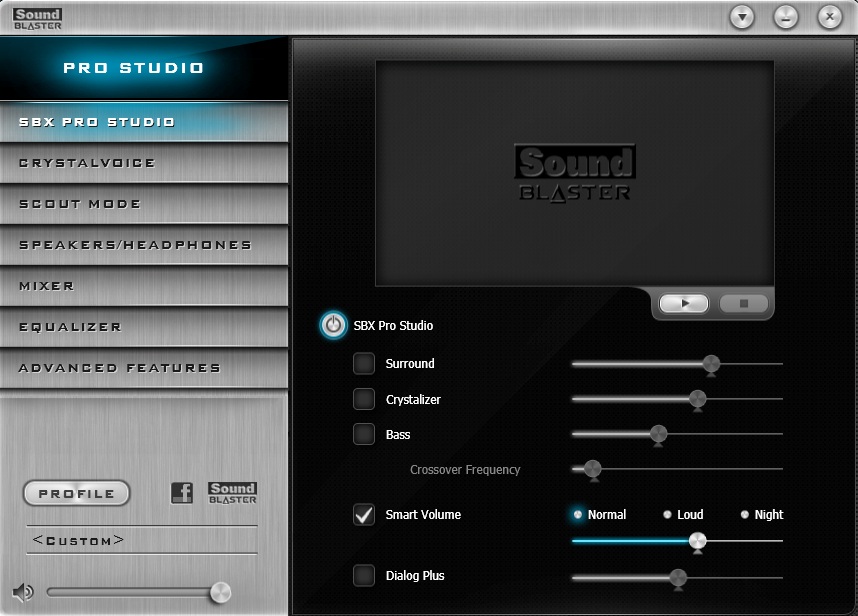


Creative X-Fi Audio Software compliments the audio chip on-board and provides several options to tweak the audio output and input. Creative’s Scout Mode allows directional audio to be enabled, which can give a certain advantage in detecting enemies in fast paced action titles. There are equalizer presets to work with as well based on user’s preferences.
Test System:
The following test system was used for this review:
- Intel Core i5-6600K, 4C/4T, Skylake, 3.5GHz base, 3.9GHz turbo
- GIGABYTE Z170X-Gaming 7 motherboard, BIOS F4a
- ADATA XPG Z1 DDR4-2400 memory, 16GB, 16-16-16-39-2T
- ASUS R9 290X Matrix GPU, Hawaii
- Kingston SSDNow V300 64GB SSD for boot drive and benchmarks
- Corsair AX760i 80Plus Platinum Power Supply
- Corsair H100i AIO Closed loop CPU cooler
- Open Test Bench
Thanks to GIGABYTE for providing the respective samples.
Benchmarks:
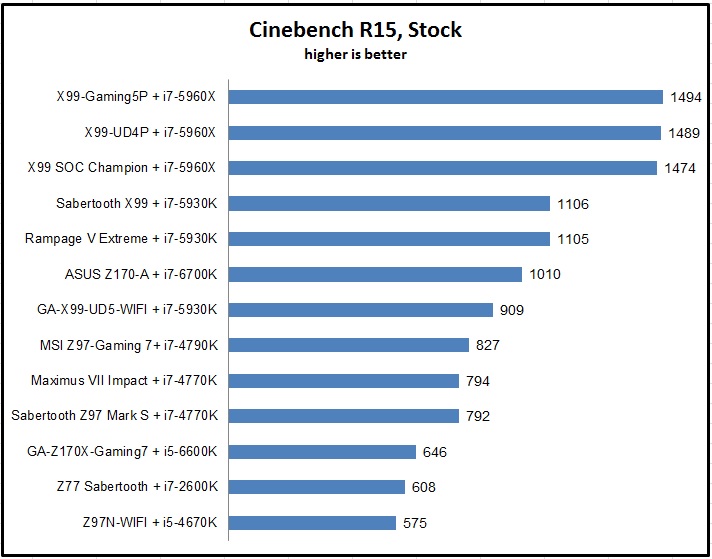
Like I did for Skylake Part 1, the benchmarking here is to compare the i5-6600K to i7-6700K and other processors. Breaking down, the benchmarks are normal CPU heavy benches, Web Based Benchmarks and PassMark.


Web Benchmarks:


PassMark test results are last, and here also the i5-6600K turns up some impressive numbers. In most of the tests it stays neck and neck with the i7-2600K. That is no mean feat.

Audio Testing:
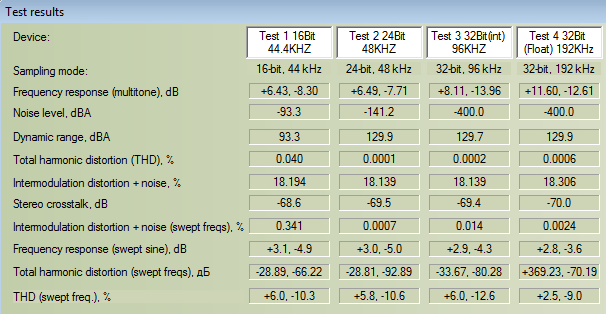
For audio testing, I took help of fellow reviewer Arya Sengupta. He ran his full audio benchmark suite on the Gaming 7.
First up, I played Basstronics’ Bass I Love You to check how much it can go low. Immediately, the result was nice. The chip was capable of reaching low frequencies of 40Hz, and the lowest it could reach was 30Hz.

The online bass tests returned a favourable sub-50Hz result.

Lastly, RMAA, or RightMark Audio Analyser was run using different sampling rates, and the results were pretty good. The highs and mids were very clear and crisp.
Subjective listening included a mixture of different genres of songs – ranging from mainstream rock to Post-Rock to instrumentals to even Bollywood chartbusters. I am not an audiophile but I could hear the difference compared to my earlier on-board solutions. I also watched some Blu-ray RIPs of movies and fired up games. In explosion-heavy games like Battlefield 4 and Far Cry 4, the renditions were crisp and the voices didn’t get muddy in the middle of the heavy noises. In less Michael Bay-ish games like Witcher 3, the Gaming 7’s audio fared even better, providing a great overall experience.
Overclocking:
For the exhaustive VRM solution that GIGABYTE offers in the Gaming 7, overclocking was supposed to be a breeze. As it turned out, it was. A mixture of good, easy to navigate options in UEFI and a good chip resulted in me hitting the 5GHz mark in the i5-6600K. While that wasn’t really benchmark stable, turning the clocks a notch down to 4.9GHz@1.38v I could run most of the benchmarks. At 4.9GHz, the i5-6600K was anywhere between 10-15% faster across benchmarks compared to stock.
The BCLK could be pushed to 200MHz, and the overclocking using BCLK tuning resulted in a 4600MHz overclock (200MHz, 23x Multiplier) using a relatively high 1.4v VCore.
Conclusion:
We are always looking at the top of the line chips whenever a new platform is released. Truth be told, most of the sales numbers come in from chips like the i5-6600K, and hence it is very important that Intel puts their best foot forward when designing the i5 chips. Historically, the i5 chips have turned out to be better overclockers than their i7 brethren (partially due to the fact i7 has to cater to four more logical cores), but for the i5-3570K and i5-4670K an increasing concern was how poorly they fared in terms of i5-2500K when it came to bumping the clocks up. The i5-6600K addresses that problem head on, and with moderate cooling most of the chips will be capable of hitting 4.5GHz+ mark, with some golden samples hitting 5GHz with ease. The chip also runs cooler compared to previous generation counterparts, another pressing concern that Intel has finally seem to have addressed. Comparing performance, the i5-6600K sits between the i7-4770K and the i5-4670K, being 10% slower than the former and 15% faster than the latter. This is a good middle point to be in, since people upgrading from older platforms will be looking for this as minima when they switch. Compared to the feature rich Z170 chipset, the i5 makes more compelling argument for an upgrade.
The GIGABYTE Z170X-Gaming 7 is positioned near the top of their motherboard stack, which means features come in spades. Beefed up VRM/Power Delivery, audio solutions from a Creative Sound Core 3D chip, dual Gb Ethernet from Intel and Killer’s brand new network controllers, USB3.1 Gen2 ports (Both Type-A and Type-C), three SATA Express ports, two M.2 ports, custom RGB lighting for the audio separation path and I/O section – the features go on and on. GIGABYTE has worked on their UEFI and now the Z170 iteration feels as it should be. There are still some rough edges here and there, but for the most part, the issues have been ironed out.
The software solution has gone through some trimming and now looks better than before. The cluttered approach has been thrown out of the door in favour of a clean, modern look which helps the usability a great deal. The on-board audio was impressive as well, even to a non-audiophile like me and should keep most of the users happy during their listening sessions. The metal shielding around the PCIe slots is again subjective – for me, I didn’t see much value in them, but someone else’s opinion may differ. I for one love the custom lighting and have praised GIGABYTE’s decision to light up the I/O section as well. This board has ample slot-spacing to hold two big GPUs, and two-way setup should be your way when you’re looking to get this board for a multi-GPU setup.
The performance of the Z170X-Gaming 7 is very good as well. This is my second Skylake board review, but I am already seeing some indication at where we’re headed. The performance, looks and features should be enough to give this board a recommendation, but in India there’s a fourth predominant factor: pricing. The Gaming 7 retails just shy of $210 outside, which makes me believe that it will be offered at sub-20k range here in India. If that is the case, then this is one of the best options to get right now. The styling and aesthetics are subjective, but for the feature set and performance, GIGABYTE Z170X-Gaming 7 makes a good point for itself, a point that is hard to ignore.
![]()


EXPLANATION
UNCORE (= not core, not CPU) is easy to set. This post is valid for Skylake 6600k / 6700k on any motherboard (Gigabyte, Asus, etc.). Among other things, the Uncore Ratio relates to the frequency of the cache used by the CPU. And you have to manually set the Uncore Ratio in the BIOS of the motherboard because it remains stuck at the stock ratio of 35 (3.5 GHz) even after you have overclocked the CPU Clock Ratio way above that. To do that my Gigabyte z170 motherboard WRONGLY indicates to set the Uncore Ratio equal to or higher than CPU clock ratio. Why wrongly?
Think about it. The cache is a slave sub-process working for the CPU core master process that it is meant to assist by temporarily storing transient CPU data. Understandably, if you make the slave faster than its master, it will cause problems (!). So the BIOS should rather indicate to “set the Uncore ratio equal to or LOWER than CPU Clock Ratio”. That’s why it is perfectly stable when you leave it at its stock ratio of 35 (3.5 GHz) even after you have overclocked the CPU Clock ratio way above that (the Uncore Ratio is then much LOWER than the CPU Clock ratio). But then the cache (slave) lags considerably behind and puts a brake on the CPU (master) which is then badly in need of an assistant that can keep up with its much higher overclocked ratio. The master has no time to wait for the slave… which leads to timing problems. Doesn’t this make a lot more sense?
At stock values, both the CPU ratio and the Uncore ratio are set at 35 (3.5 GHz) and that’s very stable as, being that low, the frequency remains stable within tolerances. But after overclocking, the frequency starts to vary a lot more and the Uncore (slave) ratio can briefly peak (too much) above the CPU (master) ratio which often causes a blue screen with (of course) a timing error like “CLOCK_WATCHDOG_TIMEOUT”. At 4.5 GHz, my CPU Clock varies between 4495 and 4504 (not perfectly 4500). To avoid it, simply set the Uncore Ratio just ONE NOTCH BELOW (as often with overclocking) the CPU Clock Ratio. For example, if your CPU Clock Ratio = 45 (4.5 GHz), then set Uncore Ratio = 44 (one under). That way the Uncore Ratio will always stay BELOW the CPU Clock Ratio.
As a bonus, on 4.5 GHz, I also noticed via CPUID HWMonitor that VCore stayed at 1.332 V Max. So I reduced VCore in the BIOS from 1.35 V to 1.34 V and got less heat and lower power consumption.
CONCLUSION
Having reached a stable overclock with all green after 2 H on Prime95, boost performance by setting the Uncore Ratio just ONE NOTCH BELOW the CPU Clock Ratio you reached. For example, at a stable CPU Clock Ratio = 45 (4.5 GHz), set Uncore Ratio = 44 (one under). Next, as an extra bonus, reduce the VCore in the BIOS, for example from 1.35 V to 1.34 V. If you no longer get all green after 2 H on Prime95, come back to the previous VCore in the BIOS, for example from 1.34 V back to 1.35 V.