In 2012, BMW DesignWorks USA and ThermalTake had a joint venture where they designed an entire range of gaming peripherals called the Level 10 series. It consisted of a mouse and a headset specifically designed for what the gamer wanted or more accurately what ThermalTake thought the gamer wanted. The mouse wasn’t a design marvel by any measure of the word but it did have its merits, extremely good ergonomics and a decent sensor rounded up this mouse. Let the idea just sink in, a company that is in the car manufacturing business showed interest in the Computer peripherals department. Asus, renown for having a finger in every pie imaginable, were not to sit idly by and let the world slip by. They introduced peripherals under the Republic of Gamers tag but soon announced a different “tag” under which all their gaming peripherals and graphic cards could be consolidated under namely the Strix tag.
“Taken from the ancient Roam and Greek word for owl, Strix means the keenest hearing and sharpest eyesight. Strix means feeling your environment so that you detect and react to the slightest movement. Strix means survival on the very edge of instinct. Strix is in your blood , as it is in ours.”
The new entrant in the world of Strix gaming peripherals is the Strix Claw mouse and the Strix Glide Speed mousepad.
The Claw employs the PixelArt manufactured PMW3310 sensor, more famously employed in the Corsair M45, Mionix Naos 7000, Mionix Avior 7000, Zowie FK1, SteelSeries Rival and the Roccat Kone Pure Military. Touted as one of the better sensors, we’ll be taking a look at the sensor along with the mouse as a whole.
The Glide Speed is designed to offer little to no resistance so you can drag your mouse across the pad without too much of an issue as opposed to the Control which has a heavy weave fabric which makes it easier to make accurate movements.
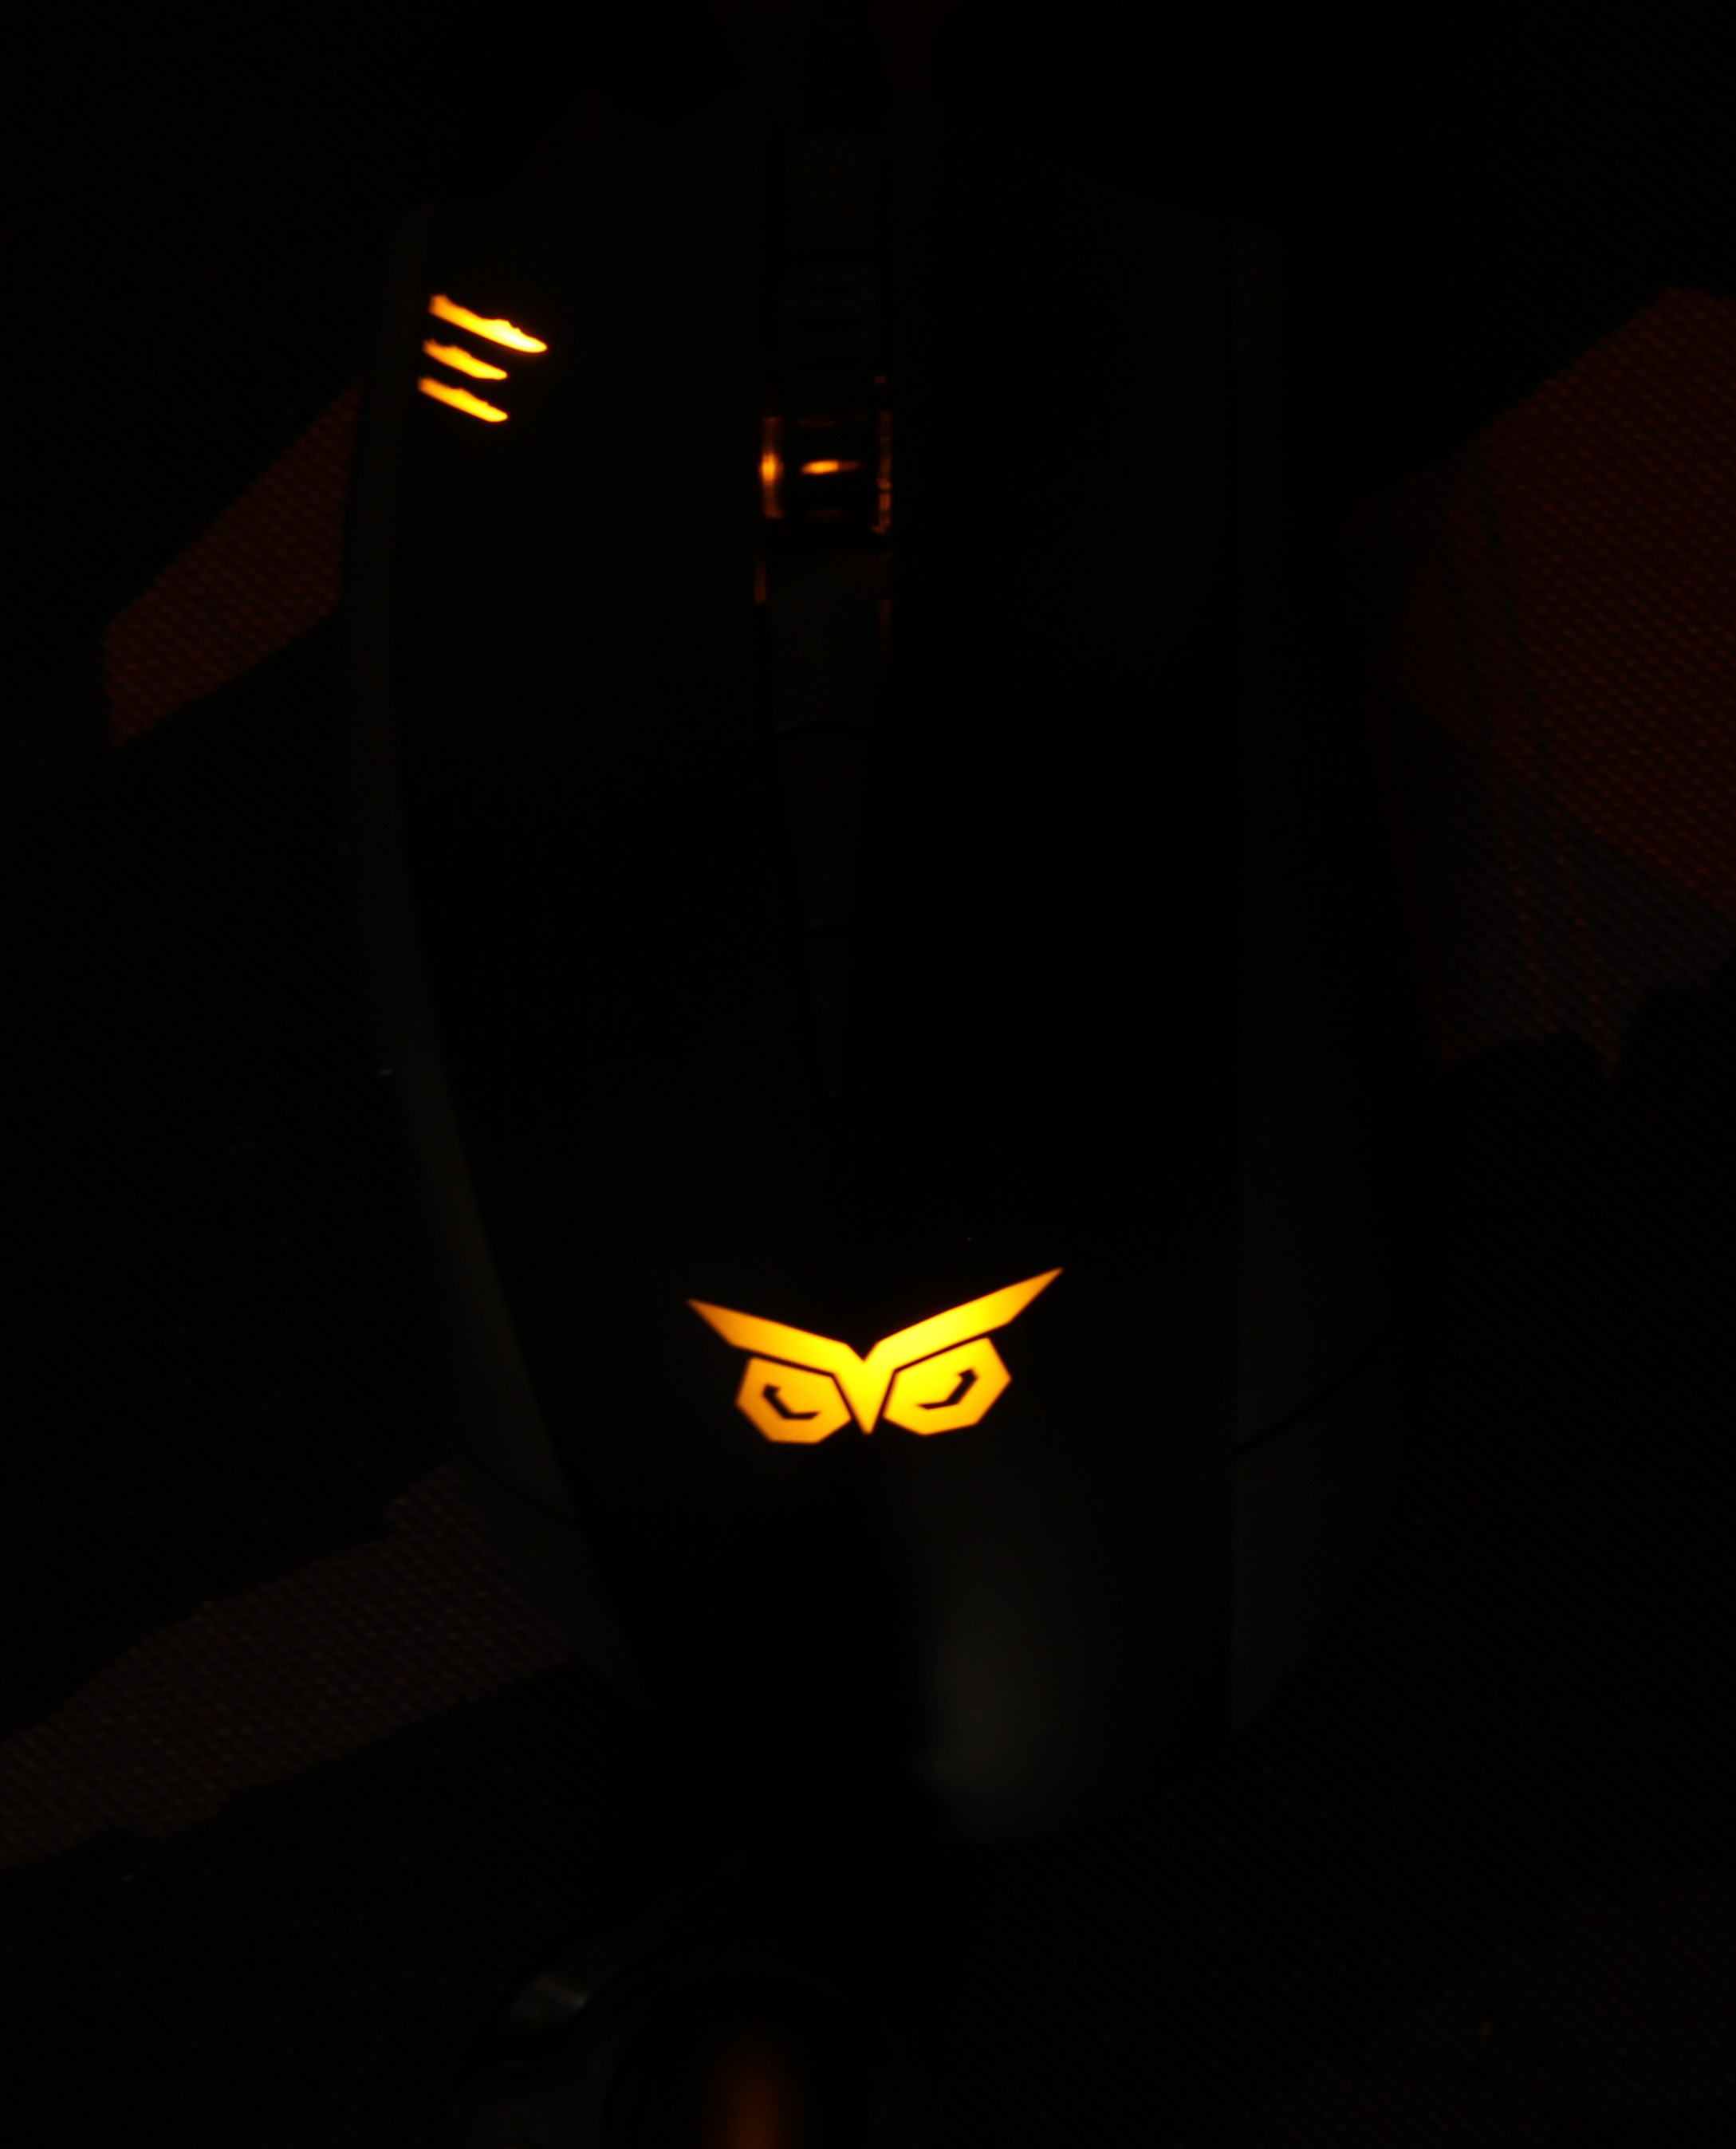
Schrodinger’s…Owl?

Let’s take a look at the packaging of the Claw. These are the features advertised at the back of the box: 3 programmable buttons, angled cable (not removable though), a DPI indicator and a 5000DPI limit.

The box itself is quite attractive, but I won’t be asking it out anytime soon. You can open up the front flap to get the view of the mouse nestled in its plastic protected home. Also on the other side of the flap you are treated to more features of the Claw:

A PSA about DPI
We here at TechArx believe in transparency and in the interest of that this is a PSA about DPI/CPI displayed in the boxes of gaming mice. A higher DPI doesn’t necessarily make it a better mouse by any margin whatsoever. DPI (Dots per Inch) or CPI (Counts per Inch) is a metric for measuring how many dots/counts the mouse cursor moves if the mouse itself is moved a single inch. It’s a statistic that is there merely for the numbers as I have yet to see somebody use the maximum DPI available, 12,000 at the time of writing this article (Logitech G502), to put it into perspective, the average gamer has a display either ranging from 17 inches to 27 inches and resolutions ranging from 1280 x 1024 to 3840 x 2160.
Using this calculator, we arrive at:
17 inch Monitor
Resolution: 1280 x 960
PPI: 8858 PPI2
22 inch Monitor
Resolution: 1920 x 1080
PPI: 10026 PPI2
At the highest DPI setting available in the market you’d cover the diagonal expanse of the screen in under an inch (0.8335 to be exact) for somebody to be precise with that high DPI is near impossible. Don’t let the absurdly high numbers dazzle you as you’ll seldom find yourself in a situation where your 8 billion DPI setting came in handy.
This somewhat pedantic PSA is brought to you by TechArx.
Opening up the box we find the mouse securely packaged in an orange plastic container with a plastic shell on top.

Included in the box are:
- The mouse
- The Driver CD
- User Manual
- VIP Membership manual

The Glide Speed’s packaging is nothing unique per say, just a box with a rolled up pad and a VIP membership manual. A user manual for a mouse pad would be a bit much now wouldn’t it?

As with dealing with any peripheral a lot of it comes to subjective appeal, the shape, the feel of the mouse and ultimately the aesthetic appeal of the mouse. So we’ll try to express that aspect of the mouse as accurately as possible, however as with anything technological we can gauge the performance of the mouse by measuring the performance of the sensor the Pixel Art PMW3310 and this can be tested and measured in a quantifiable way so that it doesn’t get lost in translation.
The Plumage
[symple_box style=”boxinfo”]
Sensor: PMW3310DH-AWQT
Resolution: Native 5000 dpi
Switches: Japan-made Omron D2F-01F
Frames per second: 6500 fps
Inches per second: 130 ips
Counts per inch: MAX. 5000cpi
Maximum acceleration: 30g
Lift distance: TYP. 3mm
Maximum polling: 1000Hz
Size: 122.55 x 71.75 x 45.25 (mm)
Weight: 110g (without cable)
[/symple_box]

The mouse itself has a very DeathAdder-ish shell but with more ridges to rest your fingers on. Both the grips: Palm and Claw grip seem to work fine and are comfortable enough to use. If you have medium to large hands then this mouse will definitely be comfortable.

The DPI Clutch button is placed in a relatively uncomfortable position as gripping the mouse a bit too tightly might result in going into that mode. The presence of this mode has however is not without its uses and as such we’ll chalk it up to personal preference. The great thing about the default bindings on your mouse are interchangeable with user created macros as explained later in the review. The side buttons have sufficient actuation pressure so you don’t accidentally press them but responsive enough that you don’t need to do more than just tap them. The part below the buttons curves inwards is a comfortable place to rest your thumb and is a definite ergonomic step in the right direction. Moving on to the mouse buttons themselves, they are curved to provide a place to rest your weary fingers.

Also placed on the left mouse button is the DPI indicator with a claw mark denoting the setting the mouse is currently on. Using the DPI up or DPI down button just above the scroll wheel you can see the level go up and down respectively depending on what DPI setting you’ve decided to use. Also the steppings themselves are completely customizable so you can go from 50DPI all the way up to 5000DPI.

The mouse buttons use the Omron D2F-01F switches and require 75gf of activation force. Another major issue with mice is the double clicking issue experienced by majority of the users (me included) but doing a bit of research on the switches themselves they belong to the same line of switches used in the Logitech G400 (otherwise known as ol’ Reliable, lasted me two years with no issues whatsoever). So double clicking as a problem shouldn’t be too prevalent but as with anything that’s mass manufactured it’s more of a luck of the draw instead of a definite impossibility.

This mouse also features on the fly DPI switching with the use of the DPI up/DPI down buttons present above the mouse wheel. The change in DPI is evident from the DPI indicator and is immediate with no discernible delay.

The cable itself has a very thick cloth braid on it that didn’t show any signs of fraying after being rubbed on the edge of the table andabused in several other ways. The quality of the braid itself is fantastic.

The cable terminates in an Aurum plated USB connector.

Also featuring my second appearance as a Hand model.
The mouse felt comfortable to hold and was just a tad bit heavier than my previous mice. The ridges helped greatly with ergonomic comfort and as such I had no objections to the plastic shell used. However I did find a peculiar pet peeve with LED lighting on the scroll wheel. Honestly what it has been advertised as is a glow that shines through the holes in the scroll wheel and under decently low lighting we found no such effect. This is an extreme form of nit picking but we felt the need to mention it anyway in the interest of full disclosure.

Now moving away from the physical realm to the realm of 0’s and 1’s we test the bundled software of the Claw and boy what a joy it is to behold.
The Talons
The included software has been christened quite aptly the Strix Software and it is an absolute pleasure to use. A glitch we noticed, however, was that after starting the software there was a 2 second period in which the mouse cursor faced some tracking issues but that’s a minor inconvenience. Each and every aspect of the mouse can be controlled here such as:
- Button customization
- DPI Stages
- Lift Off Distance
- Macro settings
- Refresh rate settings
- Lighting customization
Button Customization:
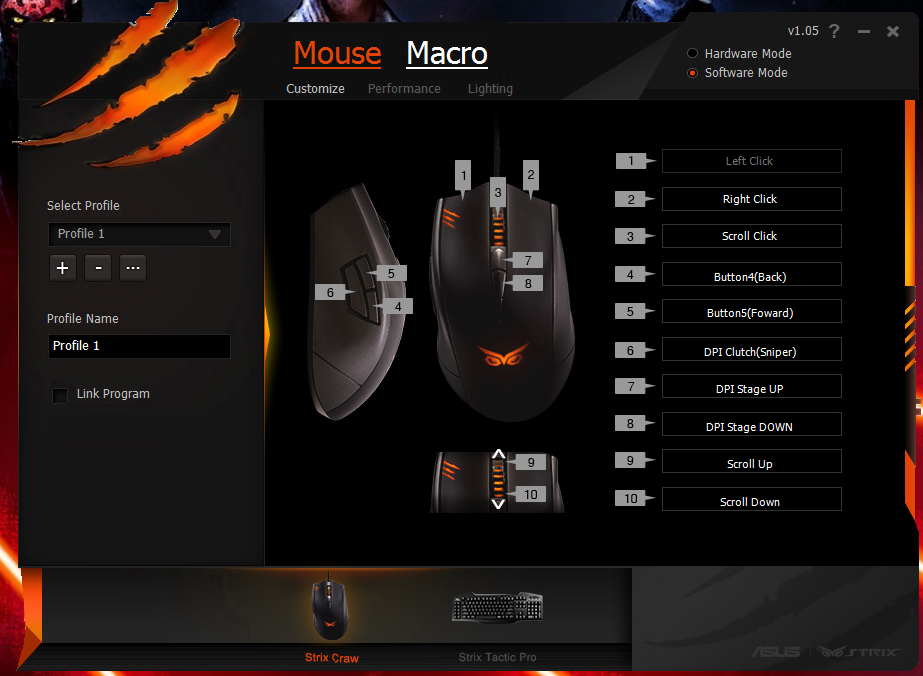
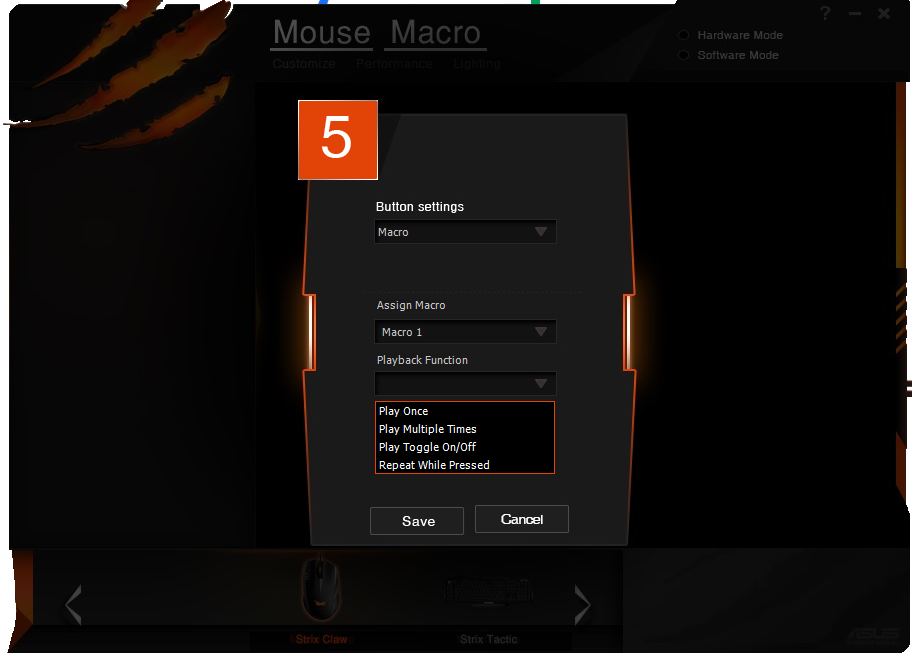
Nothing out of the ordinary as far as button customization goes but notice the Link Program check box. I suppose program specific profiles aren’t nothing new but it’s still a pleasure to see it included. If I wanted to bind say button 5 to a user made Macro 1 then the process itself is very intuitive and won’t take too many brain cells to complete:
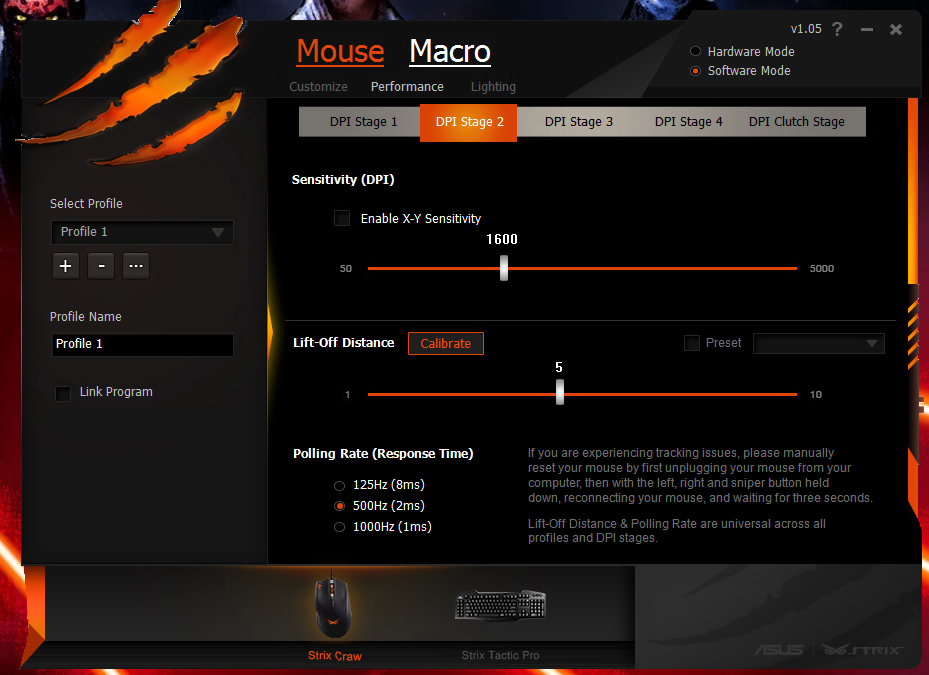
DPI Stages and Lift Off Distance:
Each and every stage of DPI is customizable as shown below and the DPI ranges from 50 to 5000 and the change is immediate with practically no delay between sliding the slider to a DPI setting and it being implemented. The Lift Off Distance is another metric of a good sensor. To put it simply it’s the minimum distance between the base of the mouse (location of the sensor) and the mouse pad (or whatever surface you use) before the sensor loses tracking. This is useful when you’re using a particularly low DPI setting and intend to lift the mouse and reset it in the centre of the mat again after scrolling till the end, LOD is a number that needs to be as low as possible.
Testing Methodology:
Due to the LOD being a particularly minuscule measurement (a matter of few millimeters) measuring it with a ruler is out of the question. We’ll be using CD’s which have a standardized width of 1.2mm. Since there is still a possibility of discrepancy the approximate LOD will be denoted in a range of n-n+1 CD where n+1 is the CD in which tracking is lost completely. Implementing this testing methodology on the Claw we got the following results:
The sensor stops tracking completely at 2 CDs.
Therefore the LOD lies somewhere between 1.2mm to 2.4mm which is a very respectable number.
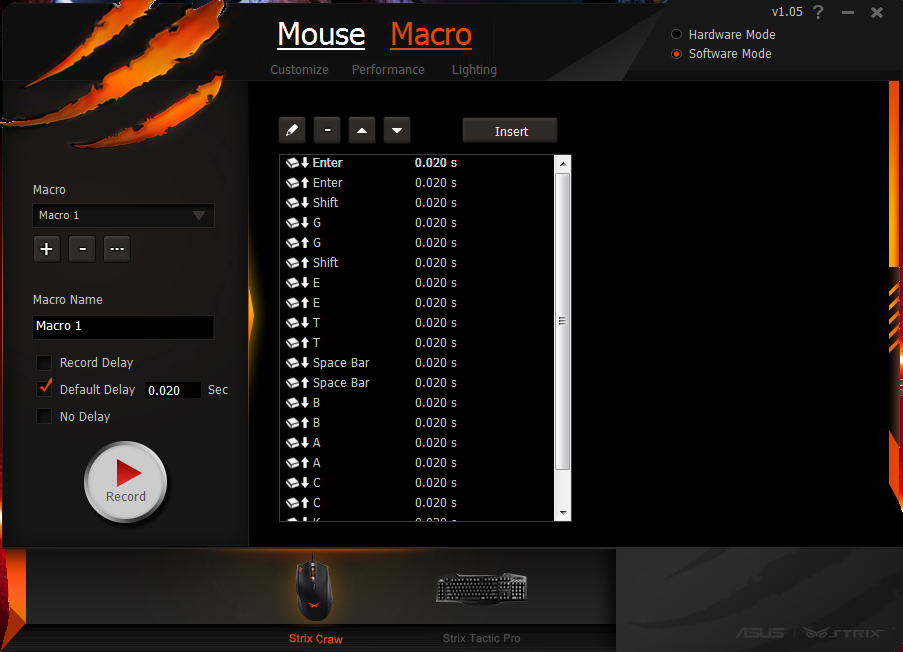
Macro Recording:
This is one of the more easier to use interfaces with a diverse range of options. You can choose the delay between each action including no delay. After you’ve made your macro you can go back and reassign any of the key presses you entered. The macro record function is spot on with detecting the button presses and the option to change the order makes it a pleasure to use.
Lighting Customization:
This is straightforward enough much like rest of the UI. You have the option of disabling the gently pulsing Strix logo and/or the scroll wheel.
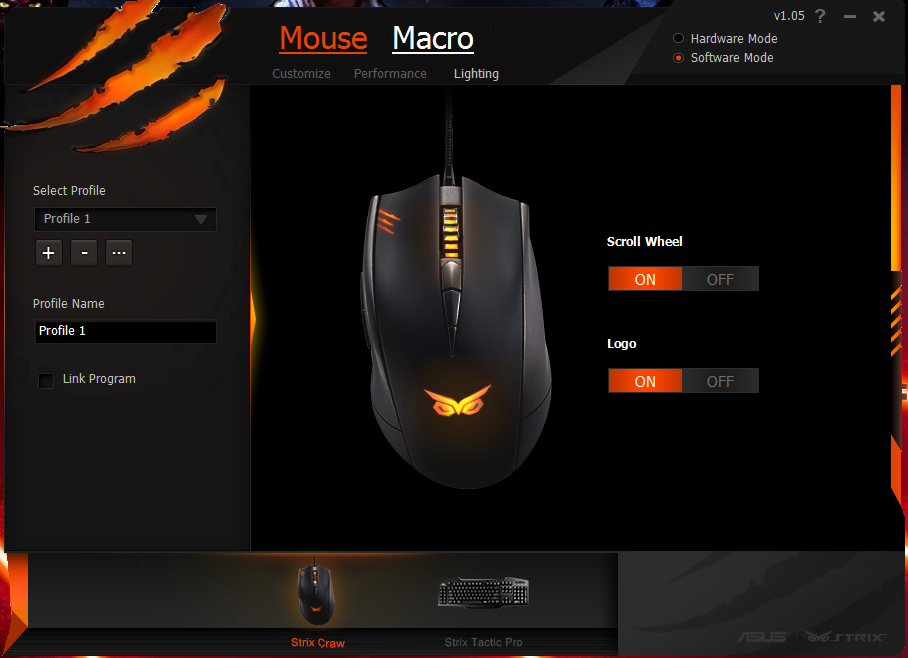


Now if you are in the possession of an extremely good pair of eyes (much like an owl) you’d have noticed that one feature of the firmware we’ve left out. Well believing in saving the best for last we bring you the onboard memory of the mouse. Any profile/macro/lighting profile can be stored onboard the Asus Strix Claw. This can be done switching from the Software mode to Hardware mode and you’ll get a huge Save button in the bottom right.


We were frankly surprised at the humility of Asus in not advertising this more aggressively but also realize by doing so they’re turning this into a regular feature instead of an unique facet of high end mice. Another step in the right direction? Or is it a leap now?
Now that we’re done with the software included let’s move on to the more objective part of the review. The testing of the sensor.
Testing methodology:
Microe, a user on Overclock.net, wrote a Mouse testing software (original post here) quoting from the thread:
As far as the plots are concerned, first thing I do is window the data (to hide the garbage at the beginning and end of the collection) using the Data Point Start and Data Point End. From there it depends on the movement that was recorded. Here are some examples:
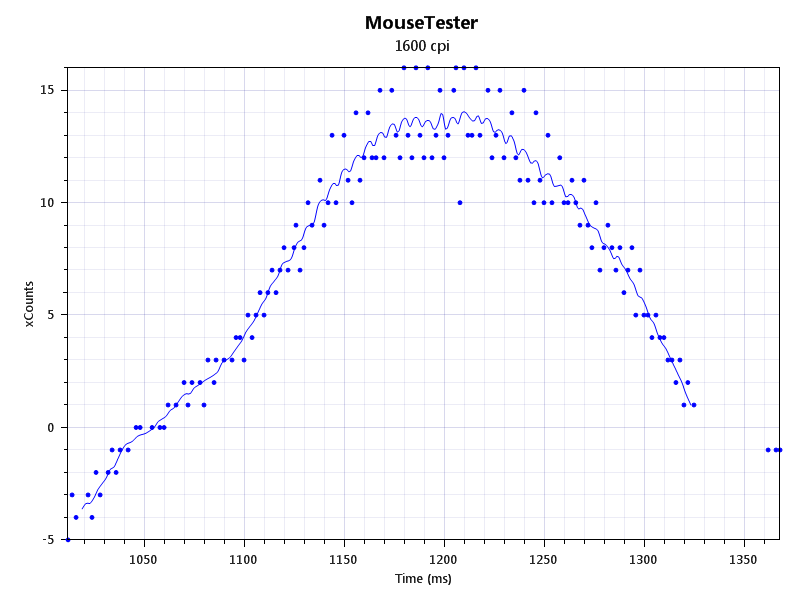
Count vs. Time: This is for looking at the raw counts from the mouse. The line is a moving average of the data and is provided as a general reference to gauge the consistency of the reporting from the mouse. For a mouse that does not loose tracking you will see the counts generally bouncing above and below the line without much deviation. If the counts deviate too much from the line then the mouse tracking may not appear smooth. If the mouse looses tracking then you will see the counts go erratic. You can also sometimes see angle snapping / prediction here (the counts will go to zero and hold there even though you moved the mouse with a slight arc). You can also see data path clipping here if the data plateaus at a fixed value (e.g. 127 for 8-bit mice). If the mouse is performing some form of multiplication for cpi boosting then you may be able to see that here as skipped counting steps.
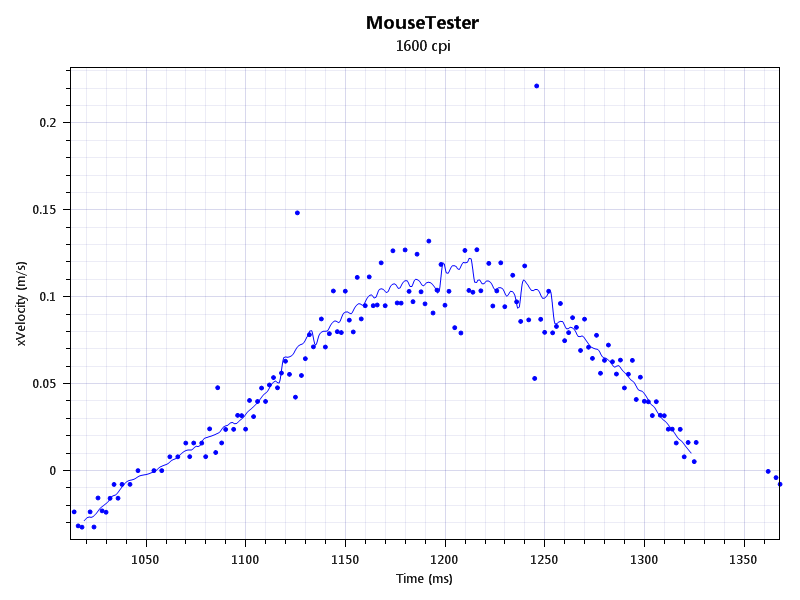
Velocity vs. Time: This uses the time interval between updates, the cpi, and the counts to calculate the velocity of the mouse movement. Using fast swipes you can try to get the malfunction rate of the mouse here. Just like Counts vs. Time going erratic, when the tracking is lost the velocity goes erratic as well.
Interval vs. Time: This is for checking the consistency of the update rate from the mouse (i.e. 1000 Hz mouse updates every 1 ms).
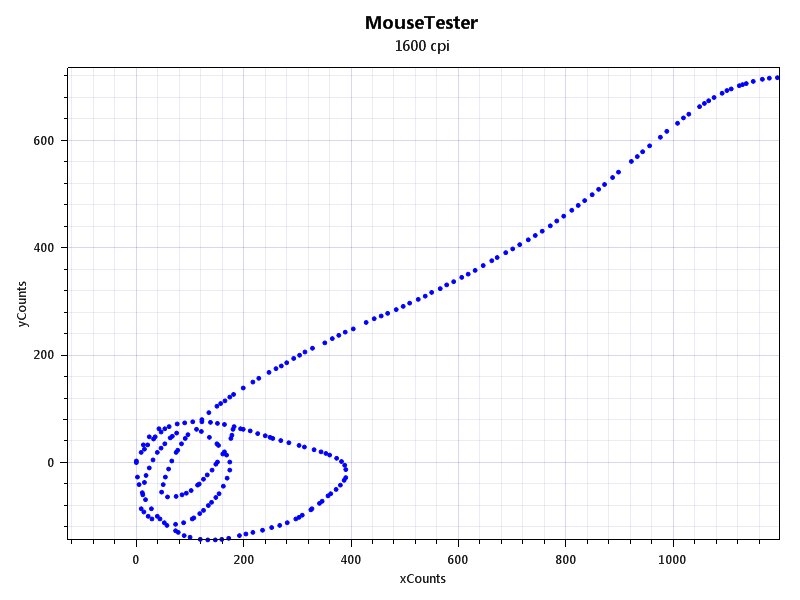
X vs. Y: This is just plotting the data that you collected as a path. Like paint testing you can draw arbitrary shapes and see the exact raw mouse reports (e.g. jitter, angle snapping, stair stepping, etc…). Arbitrary movements can be used for acceleration and accuracy testing using this kind of plot as well. For example accuracy can be tested by starting from some point “A”, moving the mouse (e.g. varying speed / angles) and then returning to point A. You should see the path that you moved the mouse along with the start and end points being roughly the same. You can do fast swipe / slow swipe back to the same point movements for acceleration testing. You can also do things like move the mouse in a bunch of circles and seeing if the path drifts away.’
We shall be using this along with Mouse Movement Recorder to test the refresh rate and to check for acceleration.
Here are the results:
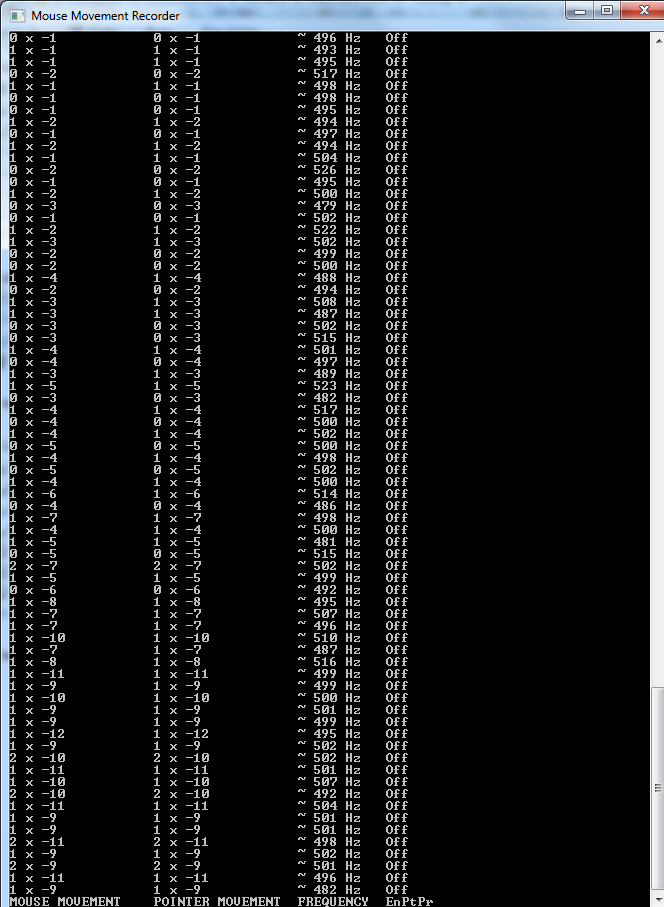
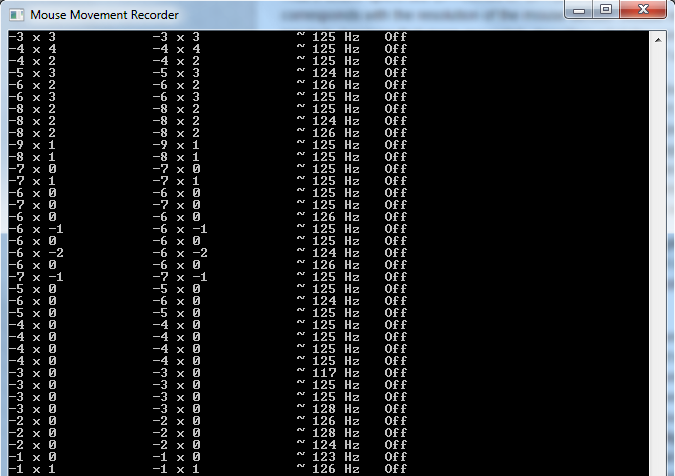
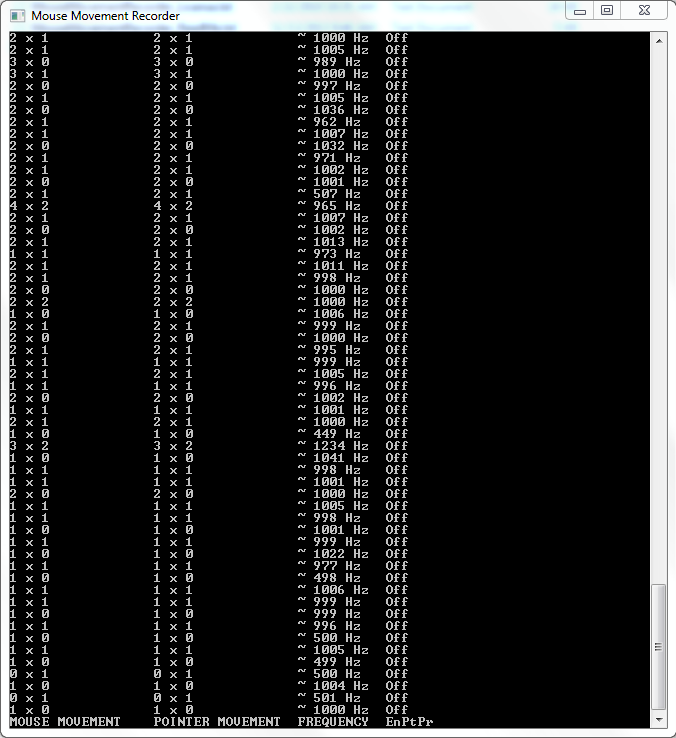
The Numbers Mason What do they mean?
The lack of a smooth curve in the graphs indicate that the mouse sensor is experiencing jitter. What does this mean for you as an end user? Honestly not that much. Such minor imperfections will hardly throw your shot while you are drawing a bead on a guy’s head or cause you to misclick and miss your spell. What it does provide is an area of improvement for Asus to work on. The 1000Hz polling rate is something some gamers prefer as it allows for a certain degree of higher responsiveness, so maybe a firmware patch is in order as the other mice having the same sensor didn’t face this issue.
Let us be clear, these aberrant results does not detract from the fact that this is a solid mouse to hold and use for everyday purpose as well as using it for gaming. These benchmarks are a numerical/visual standard of representation the performance this sensor offers.
Taking Flight
A mousepad review is difficult for two reasons:
- If the mousepad is made with cloth there’s really no difference across brands (Razer, SteelSeries, Asus) What it comes down to essentially is the build quality of the mouse pad and the finish given.
- It’s an aesthetic quandary. I might like the colour orange but you might not so me saying this pad looks good is irrelevant.
The pad itself is soft cloth weave with 3 claw slashes emblazoned on it with differing colours of orange, grey, and black. The corner reads Strix along with the ever watchful Owl eyes logo. The texture is smooth enough that dragging the mouse across the pad wasn’t much of a problem.
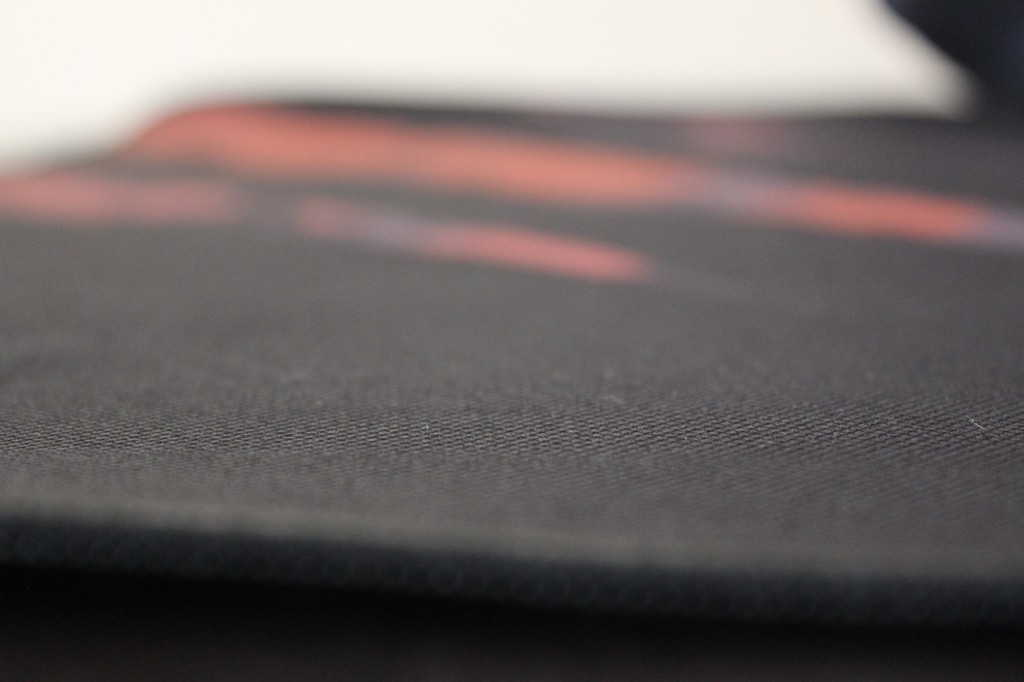
If you notice the edges of the mouse pad are stitched meaning there is no chance of the cloth part of the mouse pad coming clean off (We’re looking at you SteelSeries QcK Mass) Another advantage of having a cloth pad is the ability to wash it when it gets too dusty. Honestly there isn’t much else to say about the pad other than its a solid purchase.
Drawing things to a close
The SteelSeries Rival, Zowie FK1, Mionix Naos 7000 and now the Asus Strix Claw all share the same sensor and if the glowing reviews of the other mice are anything to go by we’d say this mouse follows suit in the footsteps of its compatriots. Priced at approximately at ![]() 3,500 – 4,000 the Claw makes a lot of sense at that price point. The Glide Speed and Control variants are both priced at a very reasonable
3,500 – 4,000 the Claw makes a lot of sense at that price point. The Glide Speed and Control variants are both priced at a very reasonable ![]() 800, definitely makes it worth a buy. Let’s take a look at the pros and cons shall we?
800, definitely makes it worth a buy. Let’s take a look at the pros and cons shall we?
Pros:
- Excellent drivers
- Comfortable shape
- Segmented mouse wheel means you don’t “overscroll” or “under scroll” (Especially useful when cycling weapons in Arena shooters and not accidentally selecting the Flak cannon when you meant to choose the Rocket launcher)
- Lighting is subtle and well done
- Side buttons and an on the fly DPI adjuster
Cons:
- The lighting on the scroll wheel is…pitiful to say the least.
- Some aberrant results when checking the 1000Hz polling rate.
- Non removable USB cable
Heartfelt thanks to the ever lovely Madhurima Khadilkar for her photography. She’s quite the shutter bug check more of her work over at her Instagram.